
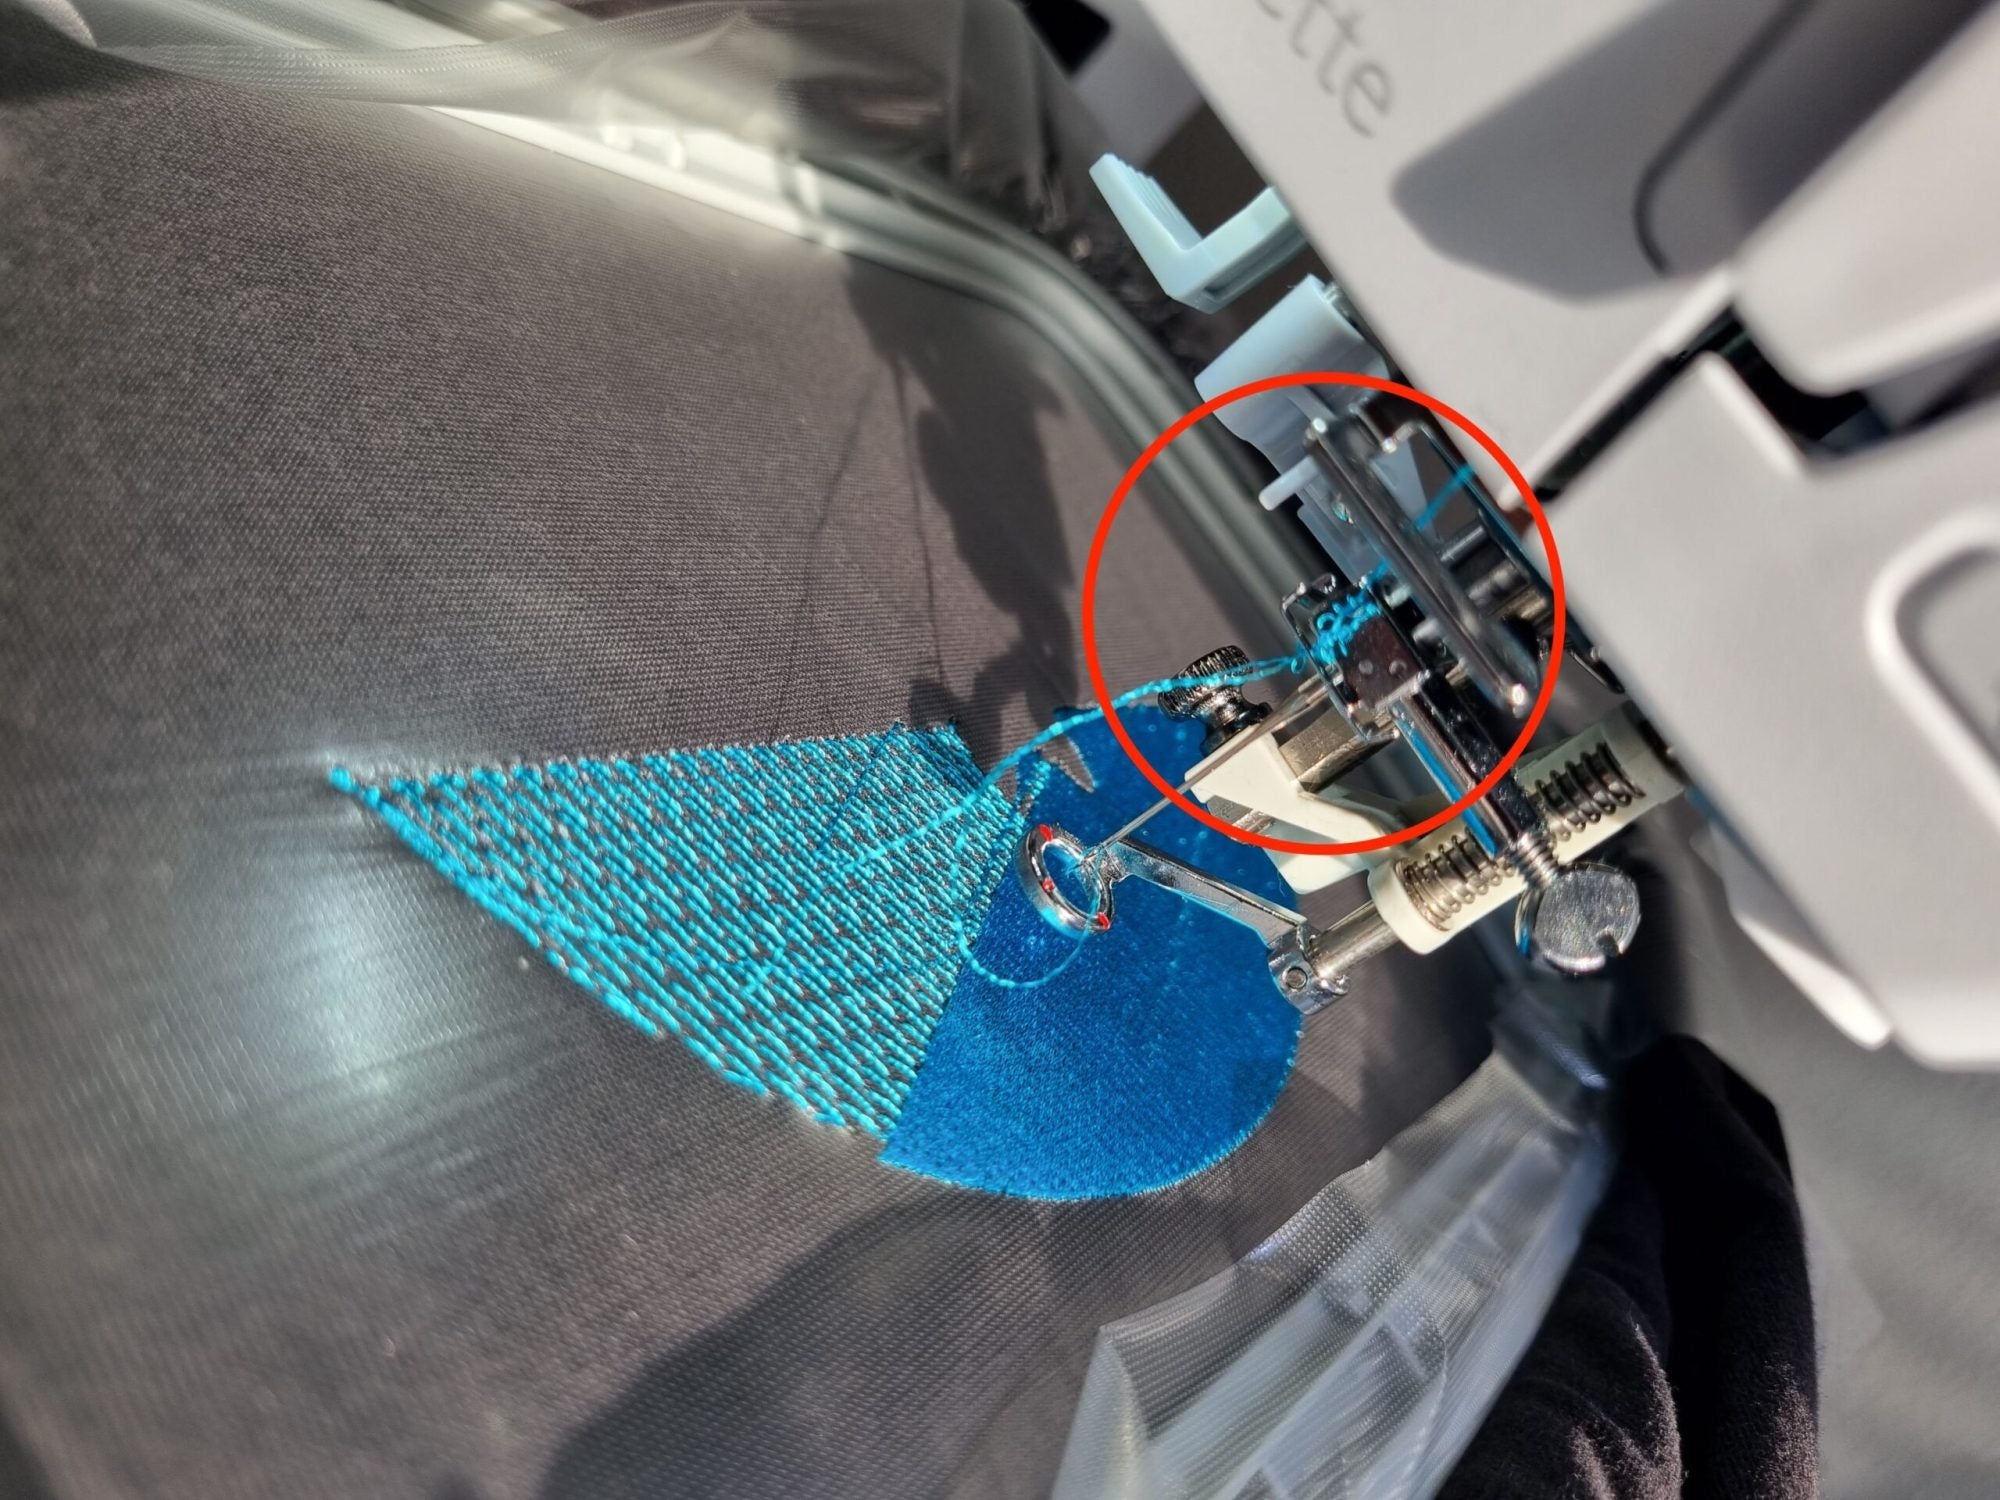
How do I know if embroidery thread is pilling?
Lint-prone embroidery thread is indicated by individual, protruding fibers, thickened threads, or small fiber balls on the embroidery surface. Dull, dull-looking embroidery lines are also signs of damaged thread. In many cases, a thread break follows shortly thereafter.
Why does embroidery thread pill or fray?
The most common causes are mechanical or thermal stress along the thread path. This can damage the yarn before it even penetrates the fabric.
Possible causes at a glance:
- Thread path disturbed: Sharp edges on thread guides, spool holder or bobbin case
- Needle problem: Wrong or blunt embroidery needle damages the yarn
- Thread tension too high: Too much tension can fray the yarn
- Wrong yarn for the project: Too thin, too old or unsuitable for the embroidery machine
- Missing yarn net insert: Especially important for rayon or metallic yarns
- Too high embroidery speed: Increases friction and temperature in the needle eye
What to do if the yarn frays or breaks?
Step-by-step troubleshooting guide:
-
Check embroidery needle and replace if necessary
→ Use a fresh embroidery needle of the appropriate size (e.g. 75/11) -
Check thread path
→ Check for rough spots, sharp edges or incorrectly threaded segments -
Adjust thread tension
→ Loosen slightly and observe the embroidery pattern -
Change thread spool
→ Test whether a different yarn is more tear-resistant or runs smoother -
Use yarn net
→ Particularly useful for smooth or fine yarns -
Reduce embroidery speed
→ Reduce the speed by 20–30% as a test
Which yarn pills most often?
- Cheap yarns: often unevenly spun or too loosely twisted
- Old yarn: brittle or damaged due to storage
Tip: For critical projects, it is better to use high-quality polyester embroidery thread (e.g. from Gunold or Sulky).
How do I permanently prevent yarn from pilling or breaking?
- Use high-quality embroidery threads
- Use new embroidery needles regularly
- Perform maintenance on the machine (e.g. cleaning the thread path)
- Reduce the embroidery speed for problematic motifs
- Avoid extreme yarn guide angles (e.g. due to reel holders that are too high)
- Store yarn in a dry, dark and dust-free place
{"layoutMobile":2,"layoutDesktop":3,"buttonAlign":"Center","buttonText":"To Product","productTitle":{"hue":213,"saturation":0,"brightness":0,"alpha":1},"priceColor":{"hue":0,"saturation":1,"brightness":0},"discountPrice":{"hue":356,"saturation":0.74,"brig htness":1},"buttonColor":{"hue":213,"saturation":0,"brightness":0,"alpha":1},"textBottomColor":{"hue":0,"saturation":0,"brightness":1},"activeTitleButton":false,"moreProduct":"View all","moreProductUrl":"qj7jnf-up.myshopify.com","rowNumber":1,"dynamicProductId":[{"id":"gid://shopify/Product/14991531278711","title":"Embroidery needle size 75 / system 130 / 705 HE","currencyCode":"EUR","amountMax":"2.9","amountMin":"2.9","price":"2.90","compareAtPrice":"3.9 5","imagesUrl":"https://cdn.shopify.com/s/files/1/0919/2954/3031/files/719447_schmetz-stick-embroi dery-embroidery_5x75_5er_719457_719447_628db7ba-9610-4aee-ab12-ccf826b4833c.jpg?v=1750951246&widt h=600","urlStore":"/products/schmetz-stick-nadel-starke-75-system-130-705-he","altImage":"Schmetz Embroidery needle 130 / 705 HE - strength 75"},{"id":"gid://shopify/Product/14991346205047","title":"Gunold AIR DUSTER, compressed air spray","currencyCode":"EUR","amountMax":"10.9","amountMin":"10.9","price":"10.90","compareAtPrice":"11.20","imagesUrl":"https://cdn.shopify.com/s/files/1/0919/2954/3031/files/gunold-druckluftspray-01.jpg?v=1750951677&width=600","urlStore":"/products/druckluftspray","altImage":"Gunold compressed air spray for cleaning your embroidery machine / sewing machine"},{"id":"gid://shopify/Product/14991521382775","title":"Poly 40 embroidery thread assortment (27 colors)","currencyCode":"EUR","amountMax":"94.9","amountMin":"94.9","price":"94.90","compareAtPrice":"109.90","imagesUrl":"https://cdn.shopify.com/s/files/1/0919/29 54/3031/files/gunold-poly-40-sortiment-27-farben-miniking-9611SORT1-3.jpg?v=1750951288&width=600","urlStore":"/products/gunold-poly-40-27-farben","altImage":"GUNOLD Poly 40, 1,000 m Miniking, partial range (27 colors)"},{"id":"gid://shopify/Product/14991328149879","title":"Embroidery needles size 70 / system 130/705H","currencyCode":"EUR","amountMax":"2.9","amountMin":"2.9","price":"2.90","compareAtPrice":null,"imagesUrl":"https://cdn.shopify.com/s/files/1/0919/2954/3031/files/organ-nadeln-stickmaschine.jpg?v=1750951709&width=600","urlStore":"/products/organ-embroidery-nadeln-70","altImage":"Needles for embroidery machine"}],"typeSearch":"product","device":"desktop","decimalsPrice":2,"aspectRatio":"3 / 4","isAutoPlay":false,"isNavigation":false,"isPriceDisplay":false,"rowDynamic":"mot","activeDecimals":false,"hidden":false,"locked":false,"positionPrice":true,"currencyCodeCustom":"$","componentName":"Products - Creativate Software","componentId":"DynamicProduct-Xrfx95h68Sf3","type":"DynamicProduct","updatedAt":"2025-07-12 T12:16:32.265Z","createdAt":"2025-07-12T12:16:32.265Z","activeDynamicProd":true,"blockName":"Product"}


Split:
Automatically cut jump stitches
Embroidery machine does not stop